After Grabbing some code example here:
https://github.com/libgdx/libgdx/wiki/Running-Demos
I am off to transforming this game into something else entirely.
Step one. Walk around as a character.

We want to get use to the code so lets have some fun. Snake like effect.

I don’t really want to keep track of all of those character positions. Let’s create an actual player object that I can re-use.
Also, for each empty space, spawn one.
That’s probably my favorite gif you’ll see, but keep reading.
Let’s practice scrolling graphics.
I forget why that red-line appeared but it was a pain.
Let’s get into populating screen data for more of an overworld feel.

So the logic is a little wonky but my set up is like this. It draws 9 ‘screens’ full of tiles. What I consider a screen is the tiles above before they start repeating. So width wise you can see 1 screen width, but you see about 1.5 screens of tiles.
So pretend you have 9 screens of tile data represented like this
0,1,2
3,4,5
6,7,8
Rather than move actual tiles I can just move the camera around, which is cool so I don’t have to keep track of any position other than the cameras.
When the screen starts you are viewing the 4th tileset data above. Let’s say you start scrolling so that the 4th screen is going down, to where the 7th screen set is. Using the cameras position, I will determine when to re-draw the 6,7,8 tile sets, but up 3 screens in height.
AKA, if I scroll down my screens would look like this
6,7,8
0,1,2
3,4,5
So every screen has an offset position, and an array of tile data. How it will work is, when the transition occures like above, it will then grab a different ‘chunk’ of overall overworld map data and populate the screen object with these tiles instead. And move them appropriately.
So right now, the screen will infinitely repeat as I’ve only manually entered 1 screens worth of tile data.
In summary:
9 screens are always drawn, but these can indefinitely scroll in any direction and will re-draw my overworld data in chunks using the cameras position to offset where it draws and what chunk of overworld tiles to load
so for those playing along at home, this is what the logic is kinda
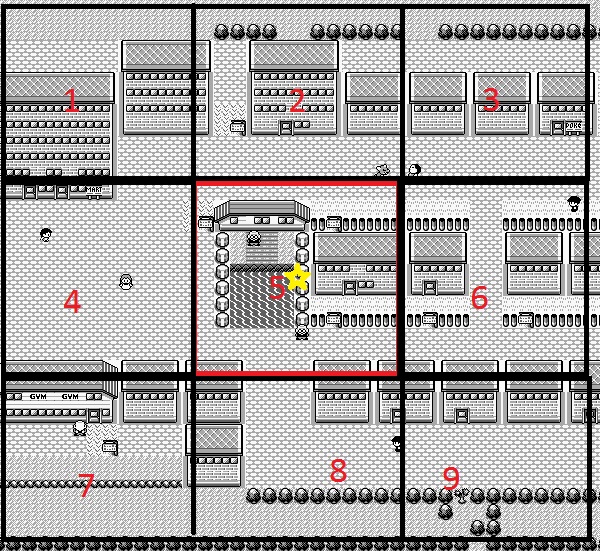
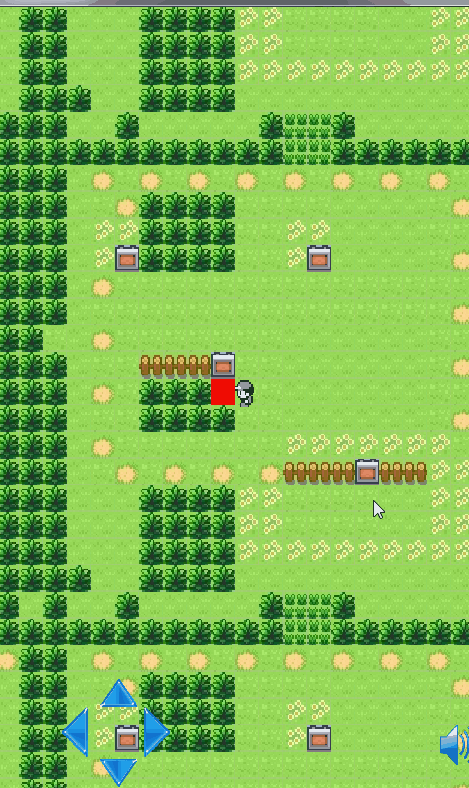
there are 9 screens worth of tiles populated into 9 screen objects. The camera is the red box only viewing 1 screen in the picture. If we were to move, the camera moves, keeping the character center. like this
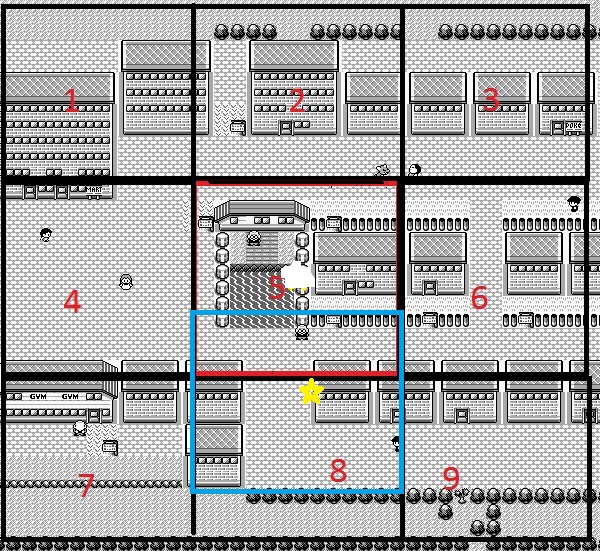
So once we get far enough away from the 1,2 and 3 objects, we will re-draw them 3 screens below their current position and calculate the chunk of tile data to be loaded into them looking like this
So we draw the character in the center of the camera, then calculate his position to the nearest 16th number because tiles are 16×16.
so each frame when we are drawing each tile, we calculate which sprite the character is actually on.
We store into memory the up,down,left,right tiles from his position and determine if these tiles are free to move
Another Gif to demonstrate movement, and stopping at solid blocks.

Let’s get the point across, with an infinite loop.

Let’s change the sprite sheet to be a little more colorful.

Let’s actually animate a walk and see what scrolling looks like.

If we zoom out, we can really see the ‘9 tiles’ of screens populated as I discussed earlier.

Where 1 screen of data kind of looks like this:
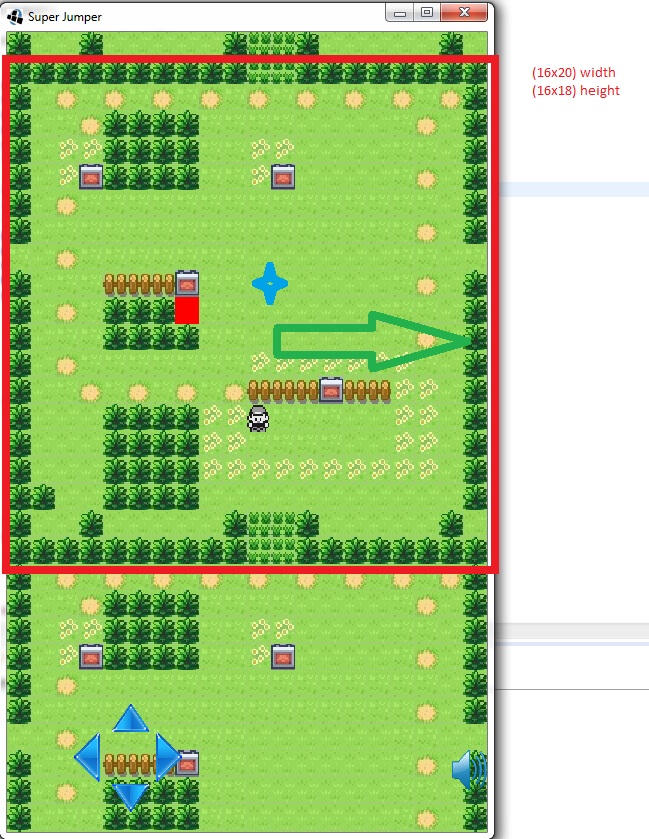
So the screen width is 16widthed blocks x 20, and the height is 16height blocks by 18 in the sense of an area drawn. the actual view point is the phone size of like 480×320 or something.
So the cameras position when you load the game is smack dab in the middle of an area.
So if you imagine the entire square area as (0,0) and the screen to the right as (1,0) etc. on a 2D graph, we can determine which screens we want to load.
The width is 320, so the cameras start position is 160. So to determine which quadrant the camera is in, we take it’s position and average it to the nearest 320th interval, then we divide by 320.
So when it starts out, it rounds to 0. divide by 320, get 0. We are in the X = 0 quadrant. We do the same for Y. Then we draw the 9 screens around it.
So if we moved 1 to the right, we’d round to 320, divide by 320, get x = 1 quadrant or (1,0).
So now we can hard set the camera to any number between a bagillion and populate that screen instantly.
it’s no real big deal, but before we’d have to manually scroll from point A to point B to determine which screens were loaded.
In Summary we are using the cameras position to calculate which screen data to load. Something like this screenData[x][y] where x and y is the position of the camera divided by the camera height/weight rounded.
Next up, scrolling text. Basically, pull the letters from a sprite sheet, and read each character in a string to draw the text.
When the text reaches the display box width limit that you set, draw a new line. If the text reaches the box height limit, draw a new text box and continue the sentence.
Though, nobody reads Text. The popular thing to do is have 1 A press to complete the box, then 1 A press to go to the next text box. And if pressed in rapid progression, it looks something like this.
Since we already store the block data of the things around the character, we can do a simple direction check, on key press and throw the block coordinates into some function that grabs the ‘sign data’ at that X and Y block location. Thus allowing different signs of text.

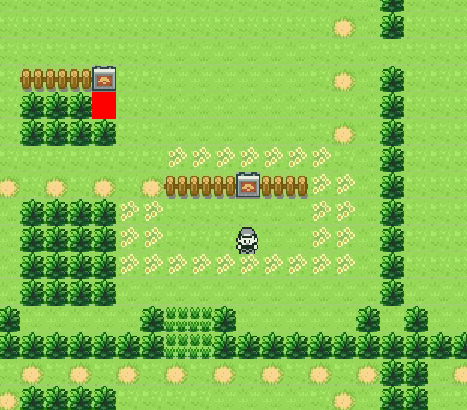
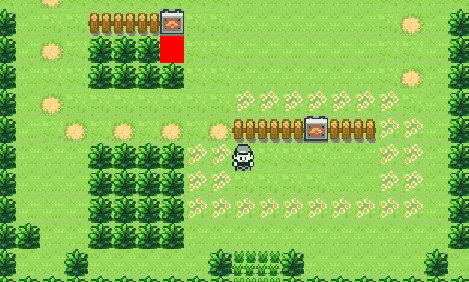
If you pretend below, that the red square is a ‘door’ to another location, it’s pretty simple to say ‘when the player is on this square, your ‘current overworld location’ changes’.
For every location value, we draw different world arrays.
On the actual overworld you might be at [0,0] world index, offset 20 by 20 tiles.
But when you load to a screen, you could set your index to other things. And consider it a cave or a house.
Next up NPCs. We want some variation of the player class. First I start by populating some characters that just walk around..
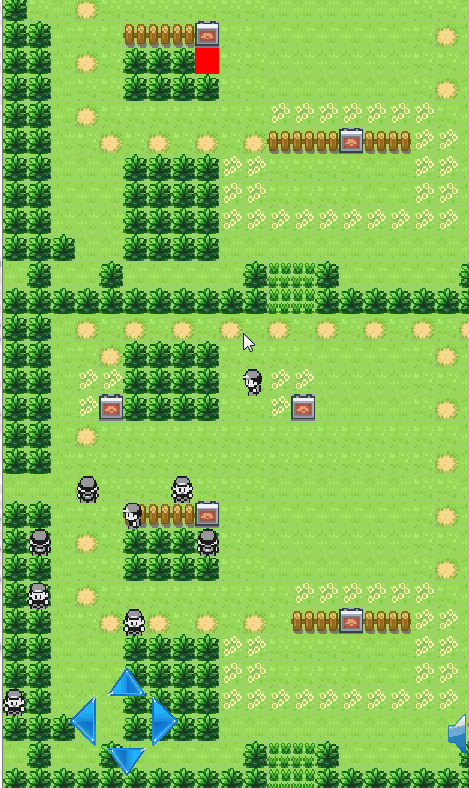
Next we want them to obey the same physics. Also stress test 50 NPCs.
Currently they ignore eachother in terms of physics.

Zoomed out we can see the unloading of a drawn tile area when we get far enough away.
Also we needed to add some sort of condition to unload NPCs as well.

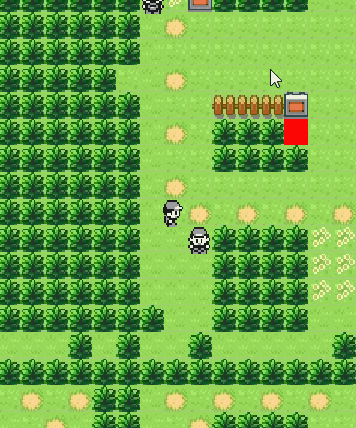
Next up, it’s easy to take the sign code for text boxes and apply them to NPCs.
You can notice a few things in the gif below. I never coded to ‘stop player ability to move’ once you talk to an NPC.
And if you both move to the same tile, you can walk into eachother.
Now that there’s some functionality I want to populate my world to feel real.
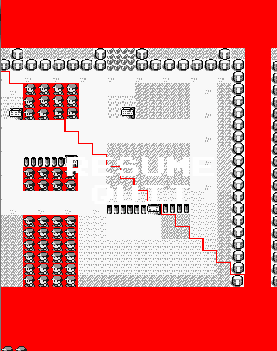
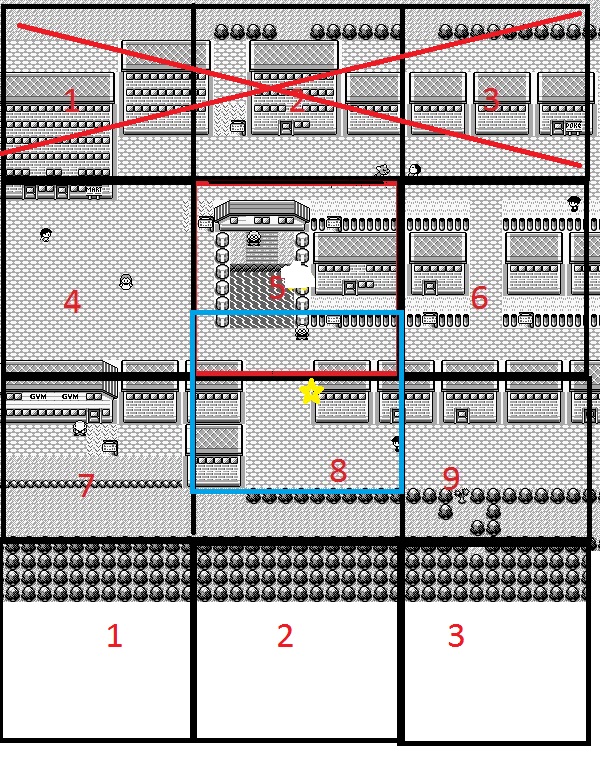
I took this overworld image that is a replica of pokemon Red and Blue:
vizzed.com/VizzedBoardFiles/Minecraft/Pokemon-FL-Kanto.png
I wrote a script that read in each 16×16 bitmap data and stored it. It also determined if the data was unique to my collection. This gave me a ‘spread sheet’.
At the same time, I stored to a text file arrays of every screen. Effectively automatically populating my world with sprites and overworld data.
Sample spreadsheet:

I populated this sprite data into a textfile.
And soon we could use this data to populate the world array, which in my case each screen looked something like this:
tempArray = new byte[][]{ {
2, 1, 1, 2, 1, 1, 1, 1, 1, 2, 3, 3, 2, 1, 1, 1, 1, 1, 2, 1}, { 2, 2, 2, 2, 2, 2, 2, 2, 2, 2, 3, 3, 2, 2, 2, 2, 2, 2, 2, 2}, { 2, 1, 4, 5, 4, 5, 4, 5, 4, 5, 4, 5, 4, 5, 4, 5, 4, 5, 4, 2}, { 2, 1, 5, 4, 2, 2, 2, 2, 0, 0, 0, 0, 1, 1, 1, 1, 0, 4, 1, 2}, { 2, 1, 6, 6, 2, 2, 2, 2, 0, 0, 6, 6, 1, 1, 1, 1, 0, 5, 1, 2}, { 2, 1, 6, 7, 2, 2, 2, 2, 0, 0, 6, 7, 1, 1, 1, 1, 0, 4, 1, 2}, { 2, 1, 4, 0, 0, 0, 0, 0, 0, 0, 0, 0, 0, 0, 0, 0, 0, 5, 1, 2}, { 2, 1, 5, 0, 0, 0, 0, 0, 0, 0, 0, 0, 0, 0, 0, 0, 0, 4, 1, 2}, { 0, 1, 4, 0, 0, 0, 0, 0, 0, 0, 1, 1, 1, 1, 1, 1, 0, 5, 1, 0}, { 2, 1, 5, 0, 8, 8, 8, 7, 0, 0, 1, 1, 1, 1, 1, 1, 0, 4, 1, 2}, { 2, 1, 4, 0, 2, 2, 2, 29, 0, 0, 1, 1, 1, 1, 1, 1, 0, 5, 1, 2}, { 2, 1, 5, 0, 2, 2, 2, 2, 0, 0, 1, 1, 1, 1, 1, 1, 0, 4, 1, 2}, { 2, 1, 4, 0, 0, 0, 0, 0, 0, 0, 6, 6, 6, 6, 6, 6, 6, 5, 1, 2}, { 2, 1, 5, 4, 5, 4, 5, 4, 5, 4, 8, 8, 8, 7, 8, 8, 6, 6, 1, 2}, { 2, 1, 1, 1, 2, 2, 2, 2, 6, 6, 0, 0, 0, 0, 1, 1, 6, 6, 1, 2}, { 2, 1, 1, 1, 2, 2, 2, 2, 6, 6, 0, 0, 0, 0, 1, 1, 6, 6, 1, 2}, { 2, 1, 1, 1, 2, 2, 2, 2, 6, 6, 6, 6, 6, 6, 6, 6, 6, 6, 1, 2}, { 2, 2, 1, 1, 2, 2, 2, 2, 1, 1, 1, 1, 1, 1, 1, 1, 1, 1, 1, 2}
};//end byte
After some hard tweaking, finally it populates the entire overworld for me.
Next step is to add to my table of ‘solid blocks’ to determine which ones I can walk through.
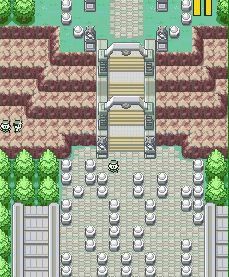
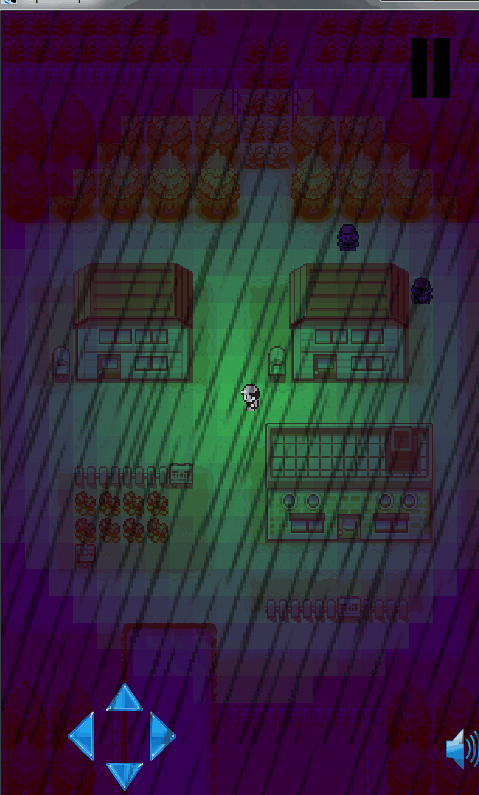
Messing with the 2D Camera settings you can add a tint, I created a sort of night/data setting.

In photo shop I made a rain.png and created a gif demo.

A quick explanation on block detection. The code grabs the blocks left, right, up and down from a players position.
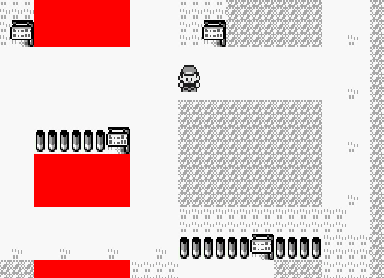
so in the screen shot below, what if the character is at [0,0] and you try to take -1 to the left? You are effectively searching at -1 location into an array.
I drew sprites to represent my boundaries. If the boundary check overflows it has to grab new array data to determine the blocks located there using the next screens array data.
When you are at the corner like below screen shot you are effectively comparing the players position to 4 blocks across 3 arrays.
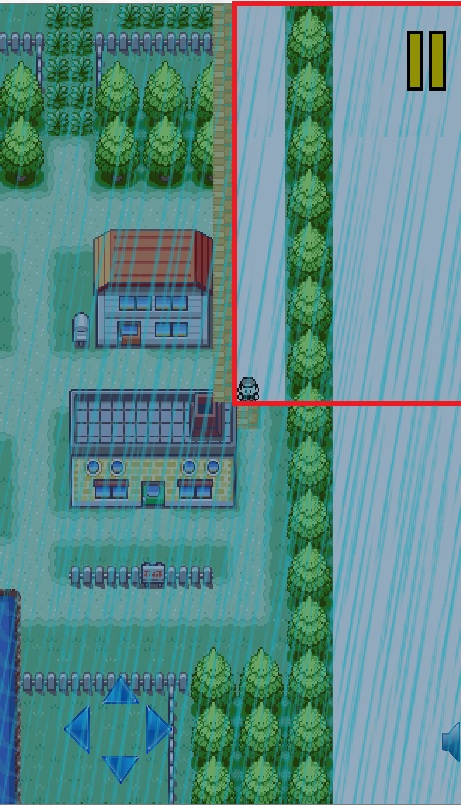
If we take the tint value, we can change the tint of each tile, using a circular offset of the characters position. Giving us this sort of ‘lantern’ effect.
We can add the rain effect ontop too.
- Images used for this demo are copyright of their respected owners. Pokemon and nintendo.